Showing posts with label home decor. Show all posts

Monday, September 6, 2021

It's Football Season !

Some say there are really only two seasons...

Football Season
and
Waiting for Football Season.

😂

While we were in the Waiting for Football Season I had a little fun with my Cricut.

I rummaged through my sewing/craft room for colored construction paper and things to recycle.

First, I found this pet-themed shadowbox I had purchased at The Dollar Tree some time back. 
I actually bought three of them with the thought of recycling them. 


I removed the Pet-friendly insert and painted it "Gator" blue.


It just took a little construction paper and vinyl to go from 
pet-friendly to football-friendly.


On one of his trips to Home Depot, Mr. Fisherman purchased a few different size tiles for me to play with.
I used one of the plain white 4x4 tiles and added a bit of orange and blue vinyl.
(Orange and blue - Florida Gator colors - of course)


Speaking of Mr. Fisherman...
he made me a few "stands" out of a wire hanger for the tile and the #1 sign.


He's just so smart and handy to have around 😉
(Not to mention handsome)

I then added removable vinyl to a plain white cereal bowl making it "The Gator Bowl".
Get it? The Gator Bowl? 
The Gator Bowl is an annual college football bowl game held in Jacksonville, Florida.
Now, you get it.
😊

And here ya go...

...finished and ready for actual Football season!

Last but not least... I made new Gator shirts for game day.

I hope everyone is having a wonderful Labor Day weekend.

Go Gators !

********************
Oh, by the way, not to brag but...
 The Gators won their first game of the season Saturday night against Florida Atlantic.
14 - 35
********************
Whoohoo !

Friday, August 21, 2020

Am I the only crazy person?

 I have tried Google, YouTube, Instagram, Bing, Pinterest, and many other ways to find ANYONE who has made or is working on the Patio Picnic Pattern from the July 2020 Sew Sampler Box.

I have searched for Patio Picnic quilt pattern, Sew Sampler Patio Picnic, July 2020 Patio Picnic, Fat Quarter Shop Patio Picnic, and many other combos of the Patio Picnic Pattern.

Nothing.

I thought maybe I could find someone who could offer a few tips or suggestions.

At the very least, I thought maybe there was someone out there having the very same issues and I would then realize - I'm not alone. 

Nope.

I think I'm alone.

Even though this darn thing is a mess, I am not giving up.

I love the colors and the pattern is really cute, but there are just too many tiny little pieces to match up.

If you are even a 16th of an inch off on one piece it throws EVERYTHING off.

Right now, I don't have enough matching fabric in my stash for the backing or the binding to complete it. My plan is to at least finish piecing the top so that when I do find fabric for the back and binding the top will be ready to quilt and bind. 


The Post Office tracking says I should receive my August 2020 Sew Sampler Box tomorrow.

WhooHoo!

Sunday, August 9, 2020

Just a reminder


Just a bit of Cricut humor.
I made this back before Covid-19 was even a thought, but I find it very appropriate especially today.
I purchased the hand soap container at The Dollar Tree, removed the label, and made it my own using my Cricut and a bit of permanent vinyl.
 It holds quite a bit of soap and is easy to refill.

In case you are wondering, I haven't given up on my Patio Picnic quilt.
We have been busy with a few home projects lately which hasn't left much time to sew.

I was hoping to finish my Patio Picnic quilt before the August Sew Sampler is released, however,
 I did notice the Fat Quarter Shop has already posted a sneak peek of the new August Sew Sampler.

Yikes!
I better get sewing...
😊

Saturday, July 18, 2020

Lucy Sews

Has anyone noticed the new photo on my sidebar in the About me section? 🠞

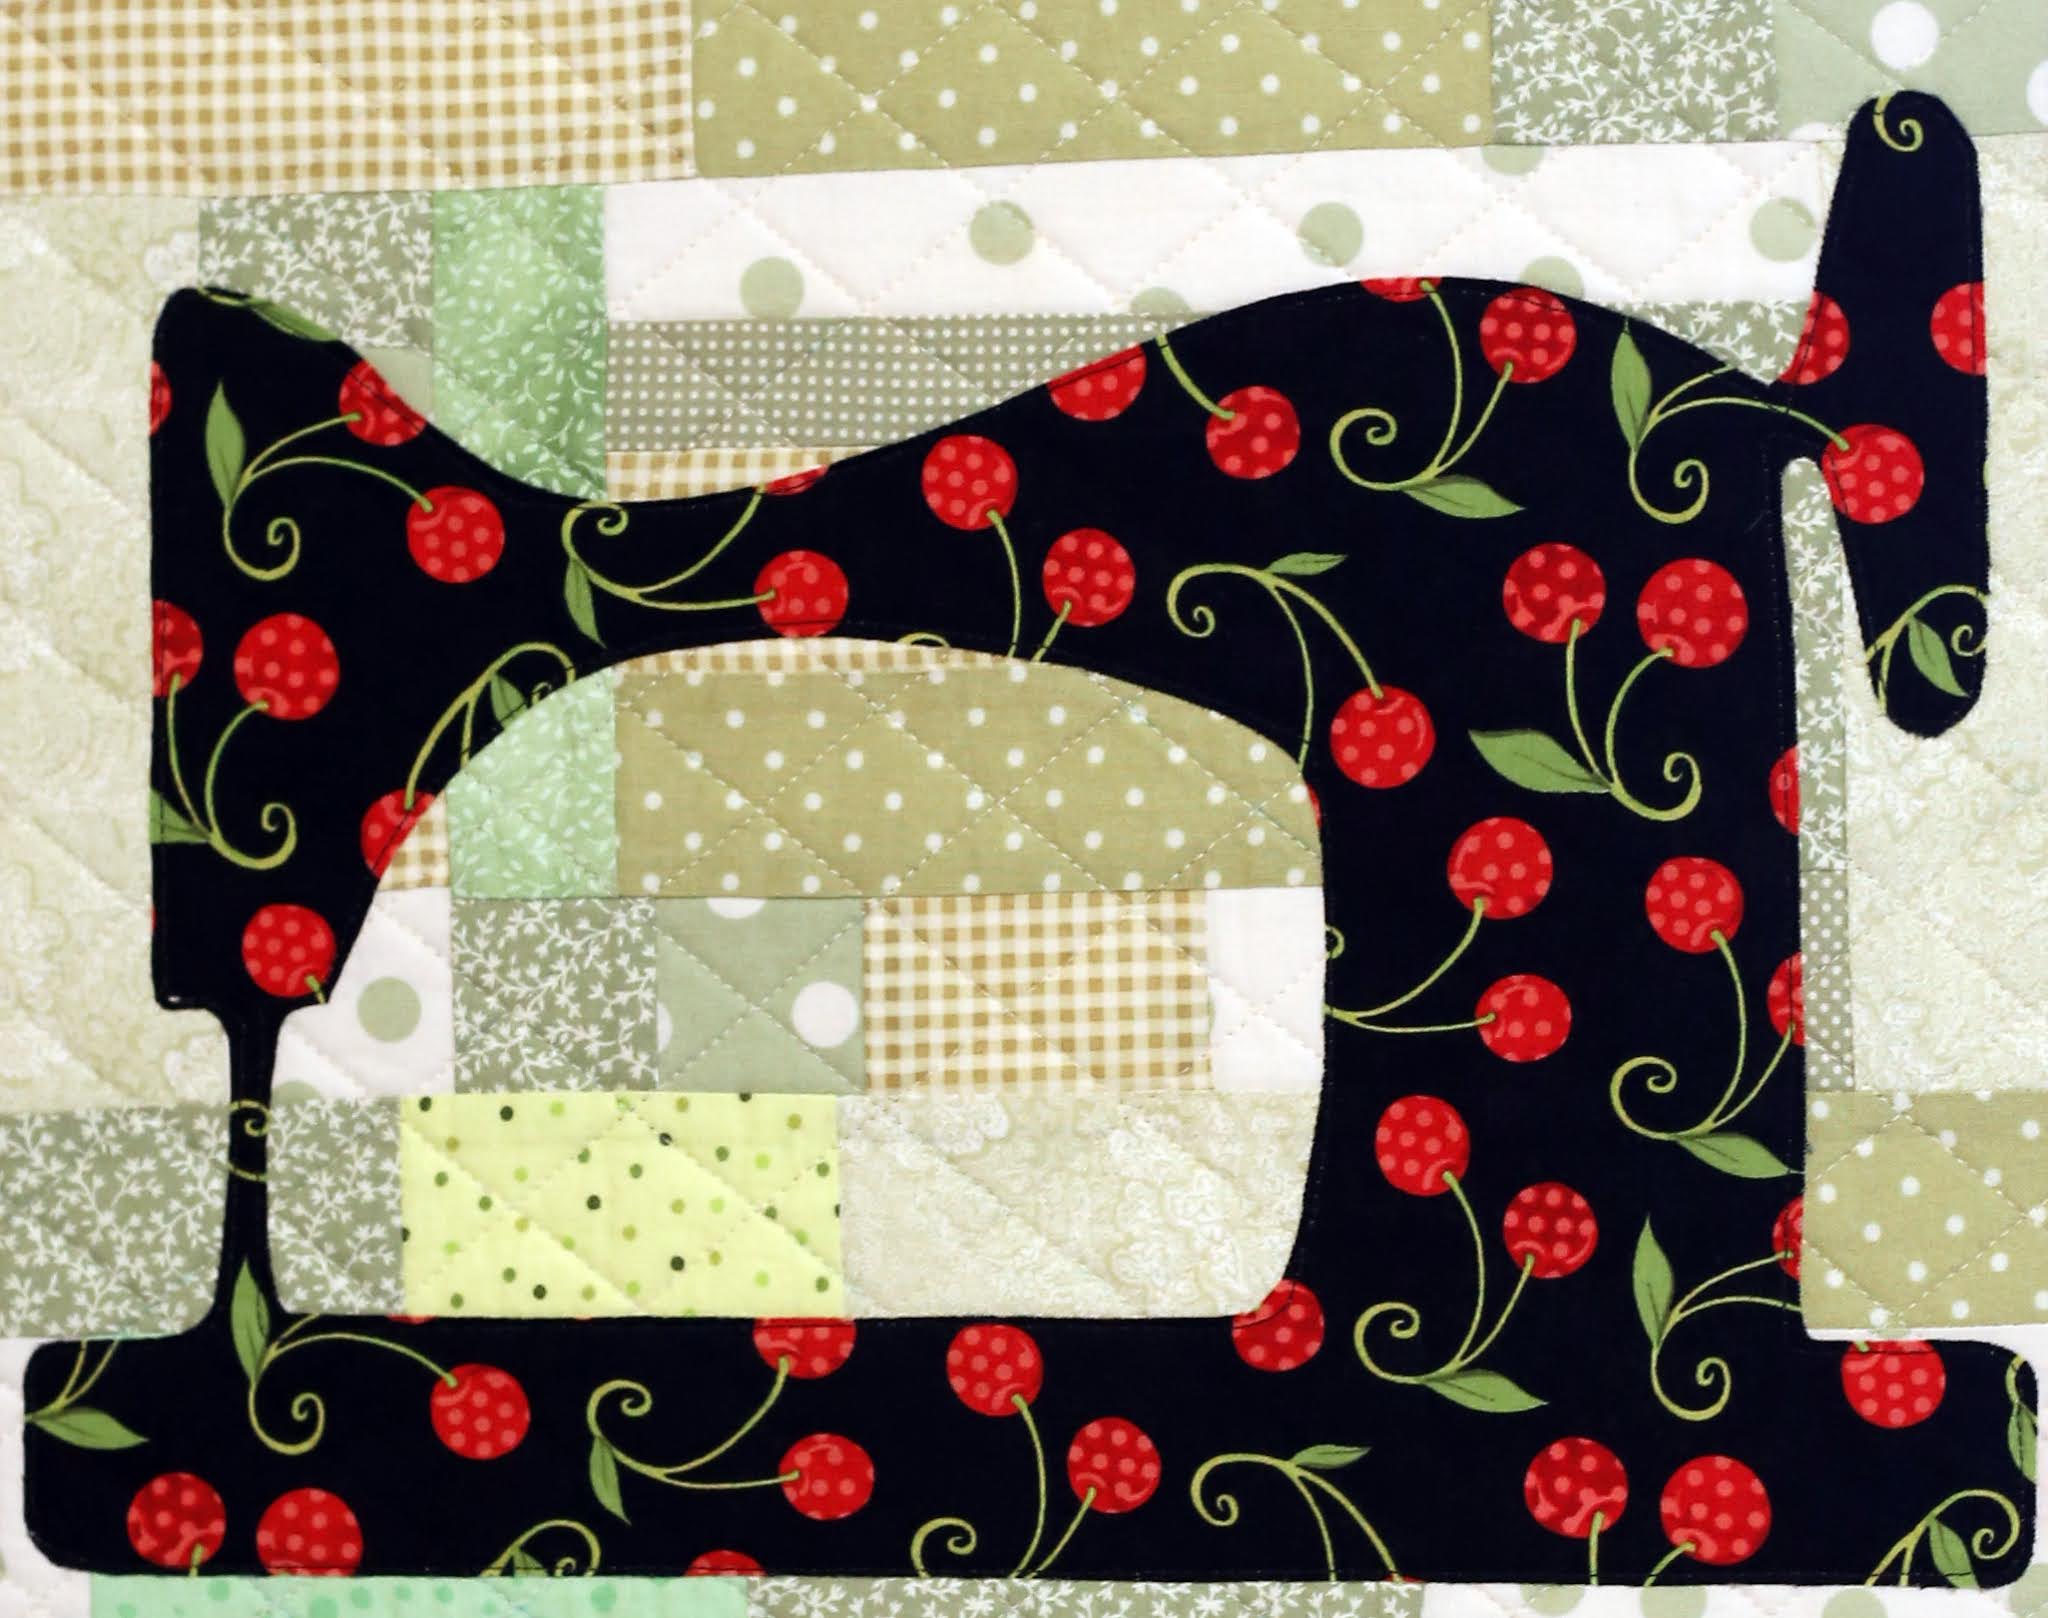
I am redecorating my sewing room and needed something new for my wall.
 
This took a lot of 4am sewing but it's finally done.
It measures 21 x 21.


This was so much fun to make.
I just made it up as I went along.

I have never been a fan of raw edge applique, but I thought I would give it a try since this is totally mine for my sewing room.

The background behind the sewing machine is pieced with a variety of green scraps.


Since I knew this was something that wasn't going to be washed frequently, I did raw edge applique around the sewing machine, scissors, thread spools and parts of the banner.


The pincushion and the cherries are both machine applique designs.

 
I am now a HUGE fan of raw edge applique.
I will definitely use it again. 
It was so much fun!

Have a great weekend everyone.

Linking today to:


Wednesday, July 8, 2020

Hello Everyone

It's been quite sometime since my last post.
Honestly, I just haven't been in the blogging mood.
Don't know why.
I'm still sewing and crafting and have plenty of things to share.

Rather than buying more fabric I have been trying to lighten my stash pile. 
Do you ever go through your stash and wonder what in the world you were thinking when you bought that piece of fabric?

Here's one of mine.
I literally haven't a clue what I was thinking.


Super ugly....
Anyhow, I thought maybe if I cut it up into smaller pieces I could hid the ugly.
Again, not really sure what I was thinking.

I found this free Floating Star pattern  on Jordan Fabrics and thought I would give it a try.

It's very similar to the No Point Star from Cluck Cluck Sew I did here.

Jordan Fabrics made a wall hanging using the Floating Star pattern.
 I decided just to use the Floating Star and make a table runner.


I will say, cutting it up didn't help a whole lot to make it any less ugly.
It's a bit busy.


Rather than using it as a table runner I decided to hang it on my antique wooden ladder for decoration.

I have yards of the red and white star fabric leftover and made the little quilt as you go flag wall hanging following a You-Tube video by Fat Quarter Shop.
It was a super quick afternoon project.

Hope everyone is staying safe at home.
See ya soon.

Tuesday, April 2, 2019

WIP (work in progress)

Yes, I'm still here...not making my blogging goal of twice a week.
Why is that?
I have good intentions.
Really, I do.
Sometimes it's life getting in the way and sometimes
(if I'm being honest)  I'm just not in the mood.
  I would rather be sewing.
And another excuse reason...
I'm not a writer.
 Sometimes it's a struggle for me to put two coherent sentences together.
(Obviously, skipping school was my favorite subject 😉)

Anyhow, I have been able to keep (and exceed) my goal of making at least one small little quilted project a month.
So far since January I have completed eight small projects.
That's almost three a month!

My "done is better than perfect" project.


One thing lead to another


A gift for a friend


A little February sewing.


Hiding your mistakes


Scrappy little hearts


More scraps


Dresden Plate


Yay for me!

Grant it, they are very small projects, but that's okay.
My whole goal was to get back into sewing after my year off.

My latest project WIP.

The Flying Dutchman.

It's actually just Flying Geese... arranged a little different.


Almost done.
Be back soon...


Thursday, March 21, 2019

Roosters, hens and baby chicks

My neighbor's kitchen and dining area are decorated in roosters and chickens.
LOTS of roosters and chickens.
When her birthday rolled around last year I was trying to come up with a gift I could make with my Cricut.
I found these glass cutting boards on sale at Walmart and (with future gifts in mind) bought five of them.


These cutting boards are super easy to personalize using your Cricut.
The design is put onto the back of the cutting board so all I needed to do was make sure I reversed all lettering before cutting it out. 


Mom, Dad and the three baby chicks.

Because the design is on the back, it's still a usable cutting board.
Hand wash only.

Happy Thursday!

Wednesday, March 6, 2019

Wrapped in history

I woke this morning to 43 degree weather.
I know for some of you that would be balmy, but I'm a Florida gal and it's freezing to us.
This got me thinking about the women in my family who hand quilted blankets out of necessity - not hobby.
 Aren't these pretty?


We inherited these when my mother and mother-in-law passed away. 
All hand made by my mother, my grandmother, my mother-in-law and both Mr. Fisherman's grandmothers.
Some have been well loved over the years and are tattered and torn.

Doesn't make them any less beautiful to me...
❤

Sunday, February 24, 2019

Are you tired of seeing my same ol' pile of red scraps yet?

Well then, lucky for you, they are almost gone....

I love making Dresden Plate blocks, they are super easy, fun and very forgiving.
I used this ruler but you can certainly make your own pattern.


This is not a tutorial on the Dresden Plate.
There are many tutorials and printable patterns out there for the Dresden blocks, therefore, I won't bore you with another.

I cut a total of 25 pieces, but found I only needed 20 for my 12" Dresden Plate.
  I was able to stitch them quickly by chain piecing them.


Depending on the size of your "blades" and the size of your overall block you may need to cut more or less pieces.

After turning and pressing, I lined the blades up in the order I wanted to sew them.


Once all your pieces are sewn together you need to choose a base to pin them to.
I chose a pretty little polka dot fabric.
For the base I made a quilt sandwich using my polka dot fabric for the top, batting for the center and a backing fabric... all cut roughly 3 inches larger than my Dresden Plate.
Since this was not going to be an actual quilt and the back was not going to be seen, I chose muslin for my backing.


I then pinned my Dresden to my base fabric, batting and backing and used my 1/4 inch foot and stitched them in place.
Once my blades were all stitched down, I then stitched the center circle in place.


I squared up my block making it approximately 15 1/2 inches square.


Now I'm ready for binding...
I stitched it to the front, folded it to the back and mitered the corners.


I did try out my new binding tool .
It's pretty handy, but I found measuring my old way was just as quick and easy.


A word of caution if you purchase The Binding Tool...
It comes in two sizes, one for larger quilts and one for small wall hangings, rug mugs, table runners, etc.
I thought I could just purchase the larger one and use it for both...nope, it's not that easy because of it's size. The larger one is too big to measure the smaller projects. 

Anyhow, here is my completed project.
Looking at it now, I wish I would have done some quilting on the polka dot fabric.
Maybe the next one...


Because I wasn't exactly sure how many "blades" I would need for my original block, I ended up making 5 too many and you know me....
 Had to find some way to use those few leftover pieces.


Another rug mug, of course!

You will be happy to know I am running out of that same ol' fabric you've seen for weeks now.
If you notice, I didn't quite have enough left and had to piece my binding on this mug rug.

Now I'm on to another pile of scraps!
😊


Linking today to:

Monday, February 18, 2019

And another...

Continued from Tuesday's post...
I still had tiny little scraps lying around the sewing room floor and couldn't let them go.
I began picking them up and just stitching them together haphazardly until I had sew together about a 5" x 8" piece.
I cut a heart out of paper a bit smaller than the one I used for the
 No Point Star block.
I was able to squeeze 4 hearts out of that scrappy little 5" x 8" piece I had sewn together.


Now, what to do with these scrappy little hearts?
I stitched together a quick little "base" using 5 by 5 inch squares and 2 inch wide sashing.
I then used my new 505 Adhesive Spray to temporarily place my hearts down while I ran a zig zag stitch around each one.


I do really like this 505 spray despite the can says it is only removable by dry cleaning.
(I did e-mail the company to ask about the dry cleaning, but I never got an answer.)
 It holds really well. I used it both to hold down the hearts for stitching and to sandwich my fabric and batting.


I added my binding and it's complete and ready for hanging.


All from scraps off the floor and a bit from my stash basket.

Thanks for looking!


Linking today to: